后续步骤
现在你已经安装了所有的先决条件,你可以创建你的第一个 Tauri 项目!
🌐 Now that you’ve installed all of the prerequisites you’re ready to create your first Tauri project!
为了开始使用 Tauri 构建项目,你首先需要安装一些依赖:
🌐 In order to get started building your project with Tauri you’ll first need to install a few dependencies:
🌐 System Dependencies
按照链接开始适用于你相应操作系统的操作:
🌐 Follow the link to get started for your respective operating system:
Tauri 在 Linux 上进行开发需要各种系统依赖。这些依赖可能因你的发行版而异,但我们在下面列出了一些流行的发行版来帮助你进行设置。
🌐 Tauri requires various system dependencies for development on Linux. These may be different depending on your distribution but we’ve included some popular distributions below to help you get setup.
sudo apt updatesudo apt install libwebkit2gtk-4.1-dev \ build-essential \ curl \ wget \ file \ libxdo-dev \ libssl-dev \ libayatana-appindicator3-dev \ librsvg2-devsudo pacman -Syusudo pacman -S --needed \ webkit2gtk-4.1 \ base-devel \ curl \ wget \ file \ openssl \ appmenu-gtk-module \ libappindicator-gtk3 \ librsvg \ xdotoolsudo dnf check-updatesudo dnf install webkit2gtk4.1-devel \ openssl-devel \ curl \ wget \ file \ libappindicator-gtk3-devel \ librsvg2-devel \ libxdo-develsudo dnf group install "c-development"sudo emerge --ask \ net-libs/webkit-gtk:4.1 \ dev-libs/libayatana-appindicator \ net-misc/curl \ net-misc/wget \ sys-apps/filesudo rpm-ostree install webkit2gtk4.1-devel \ openssl-devel \ curl \ wget \ file \ libappindicator-gtk3-devel \ librsvg2-devel \ libxdo-devel \ gcc \ gcc-c++ \ makesudo systemctl rebootsudo zypper upsudo zypper in webkit2gtk3-devel \ libopenssl-devel \ curl \ wget \ file \ libappindicator3-1 \ librsvg-develsudo zypper in -t pattern devel_basissudo apk add \ build-base \ webkit2gtk-4.1-dev \ curl \ wget \ file \ openssl \ libayatana-appindicator-dev \ librsvg注意:Alpine Linux 容器默认不包含任何字体。为了确保文本在你的 Tauri 应用中正确显示,请至少安装一个字体包(例如,
font-dejavu)。
如果你的发行版未包含在上面,那么你可能想查看 GitHub 上的 Awesome Tauri 看是否已有指南创建。
🌐 If your distribution isn’t included above then you may want to check Awesome Tauri on GitHub to see if a guide has been created.
下一步:安装 Rust
🌐 Next: Install Rust
Tauri 使用 Xcode 以及各种 macOS 和 iOS 开发依赖。
🌐 Tauri uses Xcode and various macOS and iOS development dependencies.
从以下位置之一下载并安装 Xcode:
🌐 Download and install Xcode from one of the following places:
请务必在安装后启动 Xcode,以便完成设置。
🌐 Be sure to launch Xcode after installing so that it can finish setting up.
只开发桌面目标?
如果你只打算开发桌面应用,而不针对 iOS,那么你可以改为安装 Xcode 命令行工具:
xcode-select --install下一步:安装 Rust
🌐 Next: Install Rust
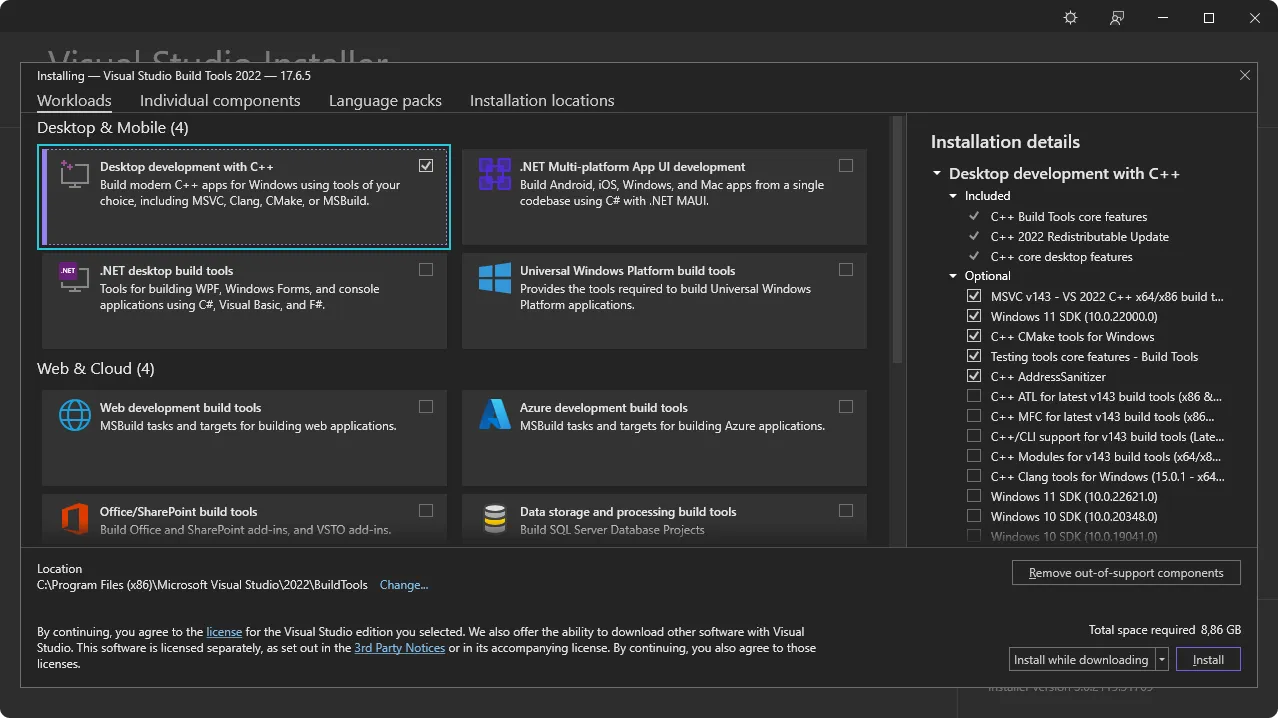
Tauri 使用 Microsoft C++ 构建工具进行开发,同时也使用 Microsoft Edge WebView2。这两者都是在 Windows 上进行开发所必需的。
🌐 Tauri uses the Microsoft C++ Build Tools for development as well as Microsoft Edge WebView2. These are both required for development on Windows.
按照以下步骤安装所需的依赖。
🌐 Follow the steps below to install the required dependencies.
🌐 Microsoft C++ Build Tools
下一步:安装 WebView2。
🌐 Next: Install WebView2.
Tauri 使用 Microsoft Edge WebView2 在 Windows 上渲染内容。
🌐 Tauri uses Microsoft Edge WebView2 to render content on Windows.
通过访问 WebView2 运行时下载部分 安装 WebView2。下载“Evergreen 引导程序”并安装它。
🌐 Install WebView2 by visiting the WebView2 Runtime download section. Download the “Evergreen Bootstrapper” and install it.
下一个:检查 VBSCRIPT
🌐 Next: Check VBSCRIPT
🌐 VBSCRIPT (for MSI installers)
在 Windows 上构建 MSI 包需要启用 VBSCRIPT 可选功能。该功能在大多数 Windows 安装中默认启用,但在某些系统上可能已被禁用。
🌐 Building MSI packages on Windows requires the VBSCRIPT optional feature to be enabled. This feature is enabled by default on most Windows installations, but may have been disabled on some systems.
如果在构建 MSI 包时遇到类似 failed to run light.exe 的错误,你可能需要启用 VBSCRIPT 功能:
🌐 If you encounter errors like failed to run light.exe when building MSI packages, you may need to enable the VBSCRIPT feature:
注意: VBSCRIPT 目前在大多数 Windows 安装中默认启用,但 正在被弃用,并且可能在未来的 Windows 版本中被禁用。
下一步:安装 Rust
🌐 Next: Install Rust
Tauri 是用 Rust 构建的,并且开发时需要它。使用以下方法之一安装 Rust。你可以在 https://www.rust-lang.org/tools/install 查看更多安装方法。
🌐 Tauri is built with Rust and requires it for development. Install Rust using one of following methods. You can view more installation methods at https://www.rust-lang.org/tools/install.
通过 rustup 使用以下命令安装:
🌐 Install via rustup using the following command:
curl --proto '=https' --tlsv1.2 https://sh.rustup.rs -sSf | sh🌐 Here is the file as a plain script: rustup.sh :::
访问 https://www.rust-lang.org/tools/install 安装 rustup。
🌐 Visit https://www.rust-lang.org/tools/install to install rustup.
或者,你可以使用 winget 在 PowerShell 中通过以下命令安装 rustup:
🌐 Alternatively, you can use winget to install rustup using the following command in PowerShell:
winget install --id Rustlang.Rustup确保重新启动你的终端(在某些情况下还需要重新启动系统)以使更改生效。
接下来:为移动目标配置,如果你想为 Android 和 iOS 构建,或者,如果你想使用 JavaScript 框架,安装 Node。否则,创建一个项目。
🌐 Next: Configure for Mobile Targets if you’d like to build for Android and iOS, or, if you’d like to use a JavaScript framework, install Node. Otherwise Create a Project.
node -v# v20.10.0npm -v# 10.2.3重启终端以确保它识别新的安装是很重要的。在某些情况下,你可能需要重启计算机。
🌐 It’s important to restart your Terminal to ensure it recognizes the new installation. In some cases, you might need to restart your computer.
虽然 npm 是 Node.js 的默认包管理器,但你也可以使用其他的,如 pnpm 或 yarn。要启用这些,请在终端中运行 corepack enable。这一步是可选的,仅在你更喜欢使用非 npm 的包管理器时才需要。
🌐 While npm is the default package manager for Node.js, you can also use others like pnpm or yarn. To enable these, run corepack enable in your Terminal. This step is optional and only needed if you prefer using a package manager other than npm.
🌐 Next: Configure for Mobile Targets or Create a project.
🌐 Configure for Mobile Targets
如果你希望将应用定位到 Android 或 iOS,则需要安装一些其他依赖:
🌐 If you’d like to target your app for Android or iOS then there are a few additional dependencies that you need to install:
JAVA_HOME 环境变量:export JAVA_HOME=/opt/android-studio/jbrexport JAVA_HOME="/Applications/Android Studio.app/Contents/jbr/Contents/Home"[System.Environment]::SetEnvironmentVariable("JAVA_HOME", "C:\Program Files\Android\Android Studio\jbr", "User")在 SDK 管理器中选择“显示软件包详细信息”可以启用安装较旧的软件包版本。只有在必要时才安装较旧的版本,因为它们可能引入兼容性问题或安全风险。
🌐 Selecting “Show Package Details” in the SDK Manager enables the installation of older package versions. Only install older versions if necessary, as they may introduce compatibility issues or security risks.
ANDROID_HOME 和 NDK_HOME 环境变量。export ANDROID_HOME="$HOME/Android/Sdk"export NDK_HOME="$ANDROID_HOME/ndk/$(ls -1 $ANDROID_HOME/ndk)"export ANDROID_HOME="$HOME/Library/Android/sdk"export NDK_HOME="$ANDROID_HOME/ndk/$(ls -1 $ANDROID_HOME/ndk)"[System.Environment]::SetEnvironmentVariable("ANDROID_HOME", "$env:LocalAppData\Android\Sdk", "User")$VERSION = Get-ChildItem -Name "$env:LocalAppData\Android\Sdk\ndk" | Select-Object -Last 1[System.Environment]::SetEnvironmentVariable("NDK_HOME", "$env:LocalAppData\Android\Sdk\ndk\$VERSION", "User")rustup 添加 Android 目标:rustup target add aarch64-linux-android armv7-linux-androideabi i686-linux-android x86_64-linux-android🌐 Next: Setup for iOS or Create a project.
rustup 的 iOS 目标:rustup target add aarch64-apple-ios x86_64-apple-ios aarch64-apple-ios-sim/bin/bash -c "$(curl -fsSL https://raw.githubusercontent.com/Homebrew/install/HEAD/install.sh)"brew install cocoapods下一步:创建一个项目。
🌐 Next: Create a project.
🌐 Troubleshooting
如果在安装过程中遇到任何问题,请务必查看Troubleshooting Guide或在Tauri Discord上寻求帮助。
🌐 If you run into any issues during installation be sure to check the Troubleshooting Guide or reach out on the Tauri Discord.
后续步骤
现在你已经安装了所有的先决条件,你可以创建你的第一个 Tauri 项目!
🌐 Now that you’ve installed all of the prerequisites you’re ready to create your first Tauri project!
Tauri 中文网 - 粤ICP备13048890号
Nodejs.cn 旗下网站